Blog
Latest posts from Upsampler.
Increase DPI of Image Online without Losing Quality! Change Images to 300 DPI or More!
Discover how to effectively increase the DPI of your images online for free or with advanced AI tools. Learn to change images to 300 DPI or more for stunning, print-ready results without losing quality.
Admin
@lucak5s
Ever been excited to print a beloved image, only to have it turn out blurry or pixelated? The culprit is often an image with insufficient pixel dimensions for your desired print size, leading to a low effective DPI (Dots Per Inch) when printed. If you're aiming for crisp, professional-looking prints, reaching a target like 300 DPI is a common goal. This guide will demystify DPI, explain its importance for printing, and show you how to prepare your images by intelligently increasing pixel dimensions (upscaling) to meet these standards, especially using online tools.
We'll cover:
- What are DPI (Dots Per Inch) and PPI (Pixels Per Inch)?
- Why is a sufficient DPI crucial for quality prints?
- How to effectively increase pixel dimensions to achieve a target DPI using different online methods, focusing on maximizing print quality.
What is DPI (Dots Per Inch) and PPI (Pixels Per Inch)?
Understanding these terms is fundamental to achieving good print quality.
- DPI (Dots Per Inch): This is a printer-specific term. It refers to the physical number of ink dots a printer can place on one inch of paper. A higher DPI generally means the printer can render more detail, resulting in a sharper printed image. When people want to "change photo DPI for better prints", they are usually thinking about the printer's output capability and the necessary input from the image file.
- PPI (Pixels Per Inch): This describes the density of pixels in a digital image when it's displayed or prepared for printing at a certain size. An image with a high PPI for its intended output size means it contains more pixel data. This abundance of data allows it to be printed at a high DPI without appearing blurry. If you need to "increase PPI of an image" for a specific print size, you likely need to increase its total pixel count.
In simple terms: A digital image with sufficient pixel dimensions (e.g., 3000x2400 pixels) provides the necessary data to be printed at a high DPI (e.g., 300 DPI for a 10x8 inch print). If your image doesn't have enough pixels for your desired print size at a target DPI, simply changing the DPI metadata won't help; you'll need to increase the pixel dimensions (upscale).
Why Do We Need Sufficient DPI When We Print?
For most prints viewed up close, a higher effective DPI translates to higher quality. Here’s why ensuring your image has enough pixels for your target print DPI is essential:
- Sharpness and Detail: Prints made from images with low effective DPI often look "pixelated" or "blocky" because there isn't enough image data for the printer to create smooth details. High DPI prints, supported by sufficient pixel data, render smooth gradients, sharp edges, and fine details effectively.
- Professional Standards: For many professional printing jobs (magazines, brochures, high-quality photos), 300 DPI is the standard target. For fine art or highly detailed images, 600 DPI might be preferred.
- Viewing Distance: While 300 DPI is common, the ideal DPI can depend on viewing distance. A large billboard viewed from far away can look great at a lower DPI. However, for items viewed closely, like photos or book pages, you'll want enough pixels to support a high DPI.
Crucially, just changing a DPI setting in an image editor like Photoshop from, say, 72 DPI to 300 DPI without altering the pixel count won't add detail. It only instructs the printer to use the existing pixels to make a smaller print. If your image has 720 pixels across and you set it to 72 DPI, it prints 10 inches wide. If you change it to 300 DPI, it prints 2.4 inches wide (720/300). To print that image larger at 300 DPI, you need more pixels. This is achieved through upscaling (also called upsampling).
The Challenge: Increasing Pixel Dimensions (Upscaling) for Higher DPI While Maximizing Perceived Quality
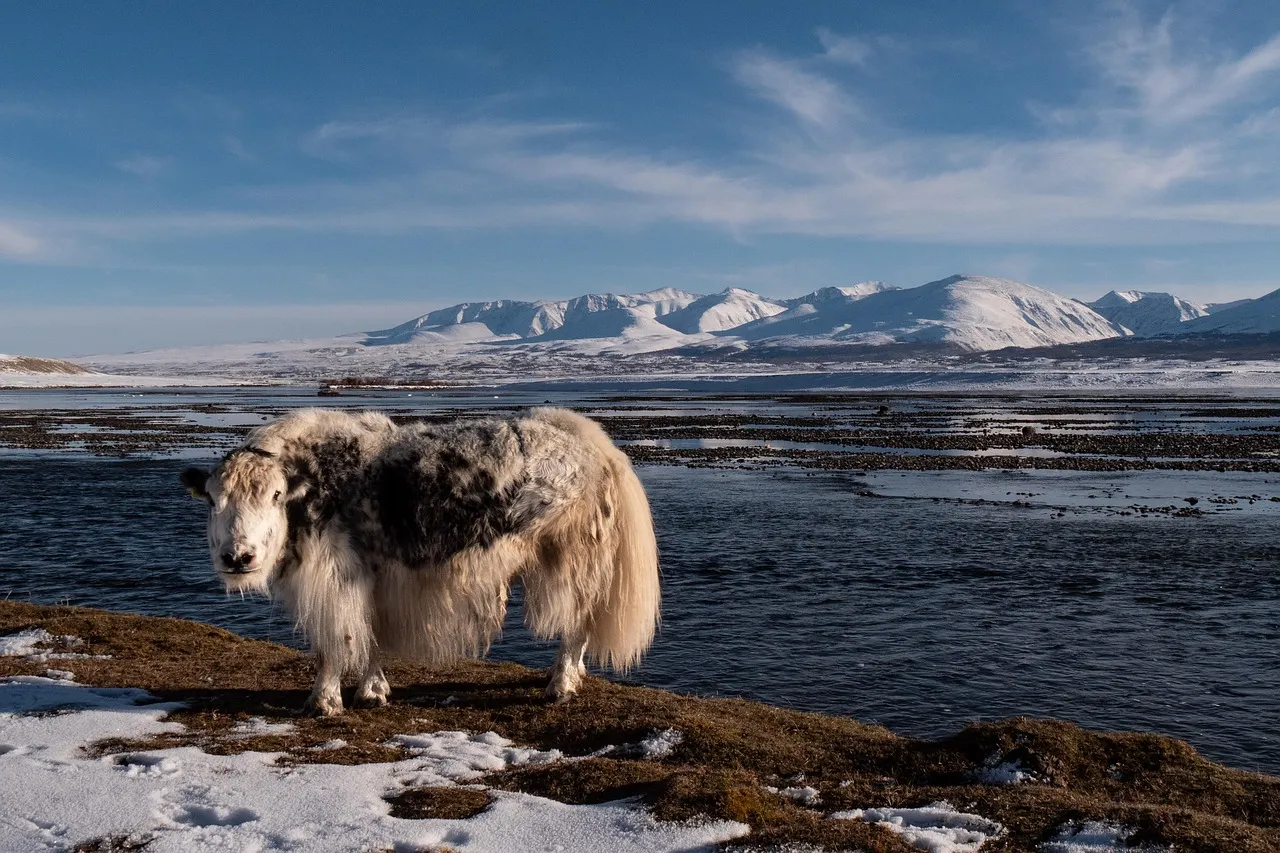
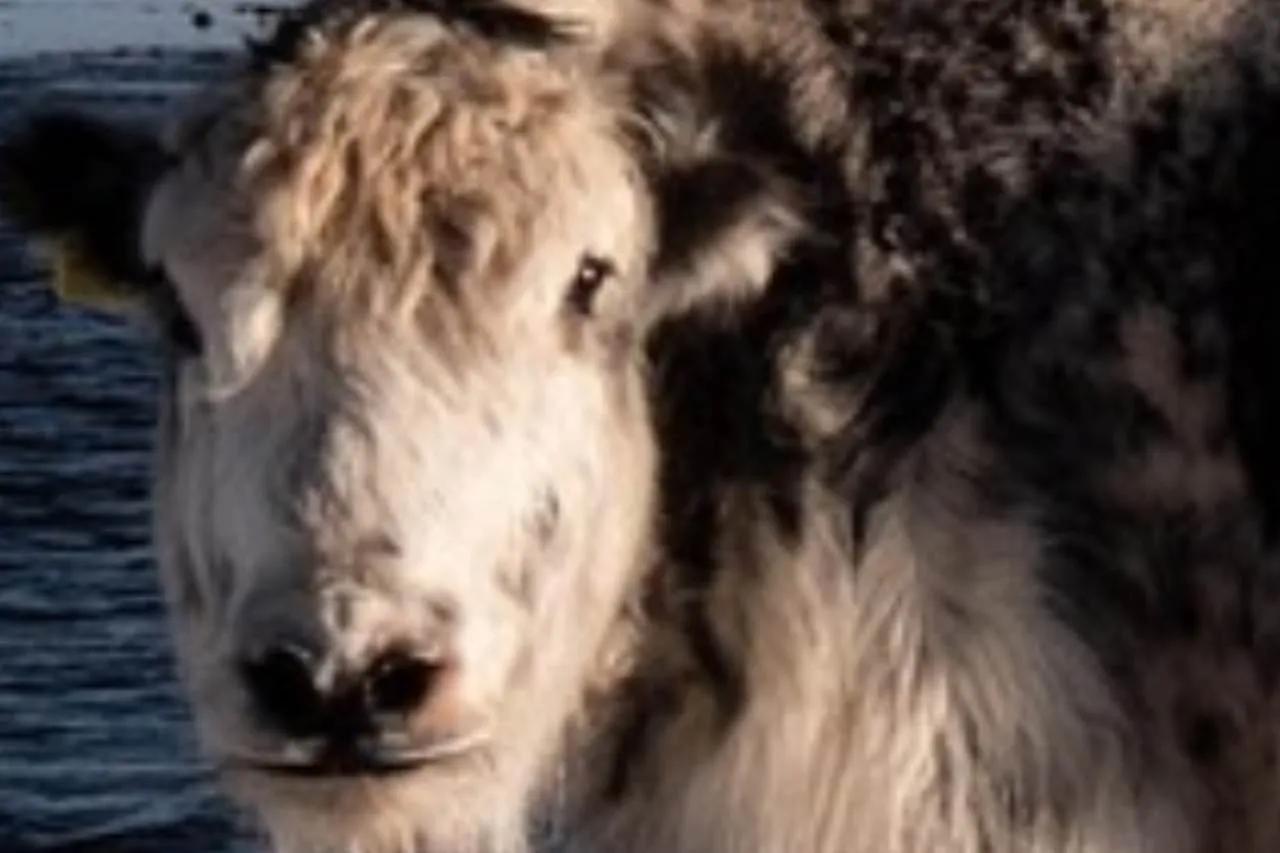
This brings us to the core issue: Can you increase an image's pixel dimensions to meet a target DPI for a larger print without it becoming a blurry, artifact-ridden mess? Traditional upscaling methods (like bicubic interpolation) "guess" new pixel values and can lead to soft or artificial results. Modern AI upscalers offer significant improvements.
Approach 1: Standard AI-Powered Upscaling Online for Free
Many online tools, including some free-to-start options like Img.Upscaler or ILOVEIMG, utilize simple AI models for upscaling. These often employ technologies like ESRGAN (Enhanced Super-Resolution Generative Adversarial Networks) or similar architectures.
How it generally works:
- Upload your image: Go to the website and select your image.
- Choose an upscaling factor: Options like 2x or 4x increase the pixel dimensions.
- Process and download: The AI model processes the image and provides an enlarged version with AI-enhanced details.
Pros:
- Often free or more accessible than highly advanced solutions.
- Can provide good results for moderate enlargements, better than traditional non-AI interpolation.
Cons:
- While AI-based, the specific models (like older GAN architectures) might be less powerful or versatile than cutting-edge generative models.
- Limited features, such as restricting image upscaling to files under 10 MB, can make it challenging to achieve the high DPI necessary for printing.
- Can sometimes introduce artifacts that may not look entirely natural, especially with very large upscaling factors or low-quality originals.
- The detail generation is based on learned patterns and may not offer the same level of creative reconstruction or coherence as more advanced generative approaches for heavily degraded images.
These tools can effectively increase an image's pixel count for better print DPI. For instance, a 1000x1000 pixel image upscaled 2x becomes 2000x2000 pixels with AI-added detail. This is often a good balance of accessibility and quality for many users.


Approach 2: Advanced Creative Upscaling with Generative AI Models
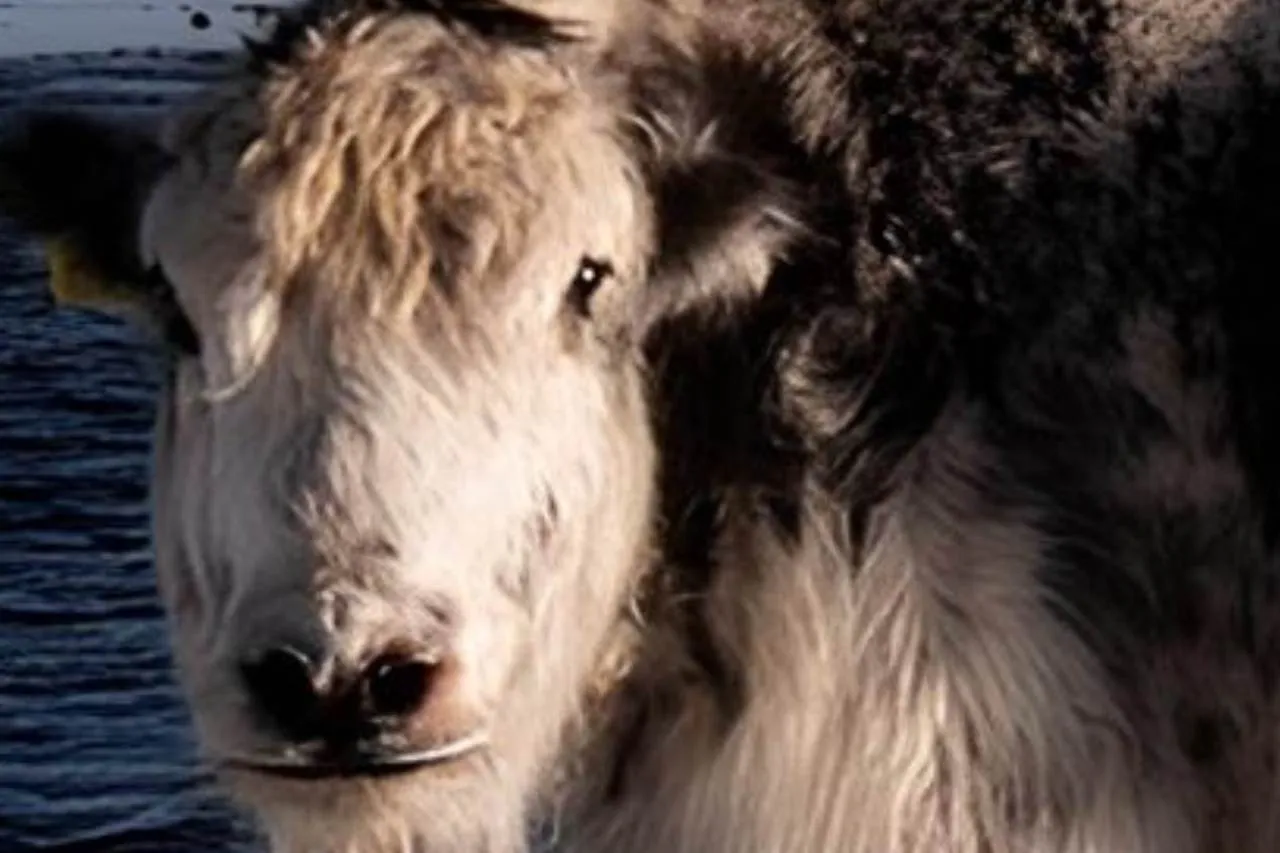
For those seeking the highest possible quality, especially when needing to significantly increase pixel dimensions, reconstruct heavily degraded images, or achieve a more "creative" and natural enhancement, advanced AI upscalers like the Creative Upscale tools on Upsampler.com leverage generative AI technology.
The generative upscalers are a mix between upscaling and full image generation, effectively enabling upscaling to any imaginable size with any amount of detail.
How Upsampler.com aims to improve results:
- Powerful Generative AI (Diffusion Models): Employs state-of-the-art diffusion models that excel at generating highly realistic and contextually appropriate new image information.
- Creative Detail Reconstruction & Enhancement: Goes beyond pattern replication to creatively generate fine details, textures, and clarity, making images appear as if natively captured at a much higher resolution. Can be exceptionally good at restoring old or damaged photos.
- Superior Naturalism and Coherence: Aims for upscaled images that are sharp, rich in detail, and free from the common artifacts seen with simpler methods, resulting in exceptionally natural-looking outputs. This is ideal when needing to prepare an image for 300 DPI or even 600 DPI prints where flawless quality is paramount.
Using Upsampler to Increase Pixel Dimensions:
-
Determine Your Required Pixels:
- To achieve, for example, 300 DPI for a specific print size, calculate the necessary pixel dimensions: (Width in inches x 300) x (Height in inches x 300). An 8x10 inch print at 300 DPI ideally requires (8 x 300) x (10 x 300) = 2400 x 3000 pixels.
-
Choose the Perfect Tool on Upsampler.com:
- For real-world photos that need creative enhancement: try Creative Upscale (start with the Flux model, then try Stable Diffusion).
- For digital art like anime: Creative Upscale (Stable Diffusion) with the 'anime' setting is often best.
- For real-world photos that should only be sharpened and not reimagined at all: use the Precise Upscale tool.
-
Upscale with the Selected Tool:
- Upload Your Image: Upload the image to the selected tool.
- Choose Your Upscaling Factor/Target Size: Select how much larger you need your image, depending on the resolution you calculated earlier.
- Choose Settings: If you select Creative Upscale, experiment with the settings. Choose a lower creativity setting if you don't want the image to change significantly.
- Let the AI Work Its Magic: The AI will intricately process and generate the new, higher-resolution image.
- Download Your High-Resolution Image: You'll receive an image file with significantly more pixels and genuinely enhanced, newly generated detail.


What About Other Tools like Photoshop?
Desktop software like Adobe Photoshop has integrated some AI into its upscaling capabilities. Its "Super Zoom" (part of Neural Filters) and the "Preserve Details 2.0" resampling option utilize Adobe Sensei AI to attempt intelligent image enlargement. Despite its AI features, Photoshop's upscaling primarily works by enhancing existing pixel data through sophisticated interpolation or pattern recognition. It fundamentally lacks the advanced generative power found in dedicated diffusion model-based upscalers like Upsampler.com. This becomes critically apparent when dealing with very low-resolution inputs, requiring true creative reconstruction, or needing to generate entirely new, artistic details that simply don't exist in the source.
Conclusion: Prepare Your Images for Stunning Prints!
Understanding the relationship between pixel dimensions, print size, and DPI is key to achieving high-quality printed images. While simply changing a DPI tag in metadata isn't a solution if your image lacks sufficient pixels, modern AI tools have made it more feasible than ever to intelligently upscale your images.
- For accessible AI upscaling, tools utilizing basic models like Img.Upscaler offer a good step up from traditional methods.
- For superior, creatively generated results, especially when needing to significantly upscale, restore, or achieve the most natural and detailed enhancements for critical prints (targeting 300 DPI or more), the generative AI power of Upsampler.com represents the cutting edge. With no subscription required and one-time credits that never expire, you can upscale on your own schedule.
Stop wondering if you can get better prints. By understanding your image's current pixel dimensions, your print requirements, and the capabilities of different AI upscaling technologies, you can choose the right method to prepare your files for masterpieces with impressive clarity and detail.